How to Plan in a Dashboard LifePlanner™ + 10 Creative Planner Prompts

In the world of weekly planners, it can be overwhelming choosing the right planner layout for your planning style and schedule. That’s why our Erin Condren planning experts have created planning guides to help you compare and contrast planner features to find your perfect match. This guide is all about our newest weekly LifePlanner™ layout: dashboard.
First, we’ll explore what the Dashboard LifePlanner™ is, how to plan in it, and offer helpful planning prompts for this particular layout. At the end of this guide, we’ll also set you up with other LifePlanner™ layout guides to help you discover the best planner that makes your daily routine smoother (and your life easier).
What Is a Dashboard LifePlanner™?
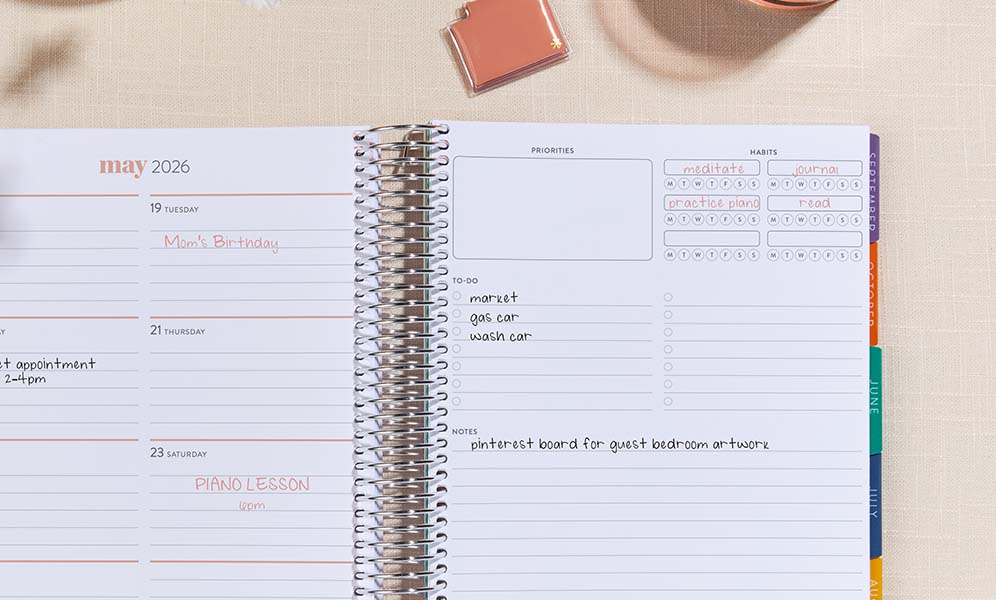
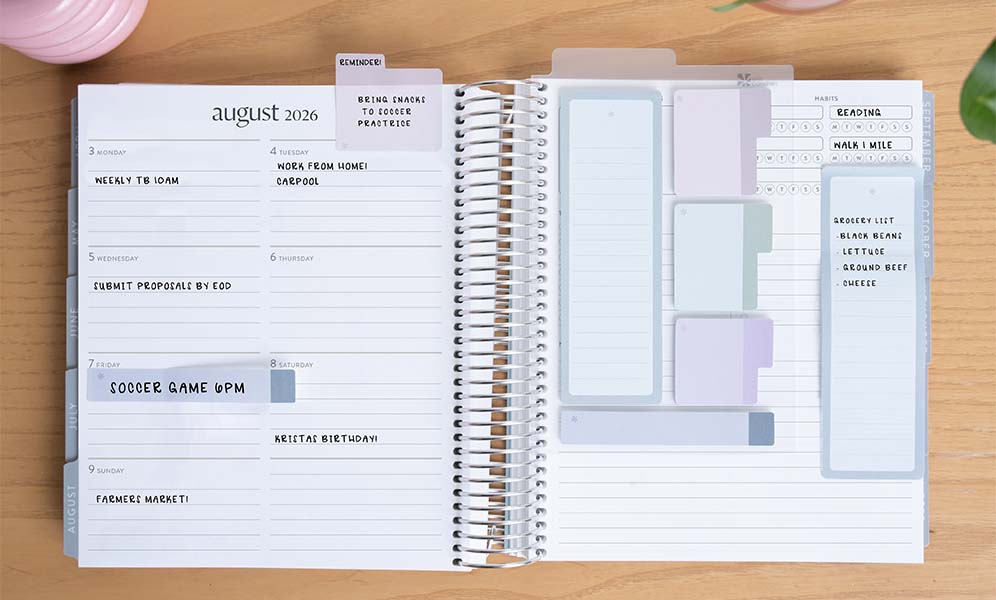
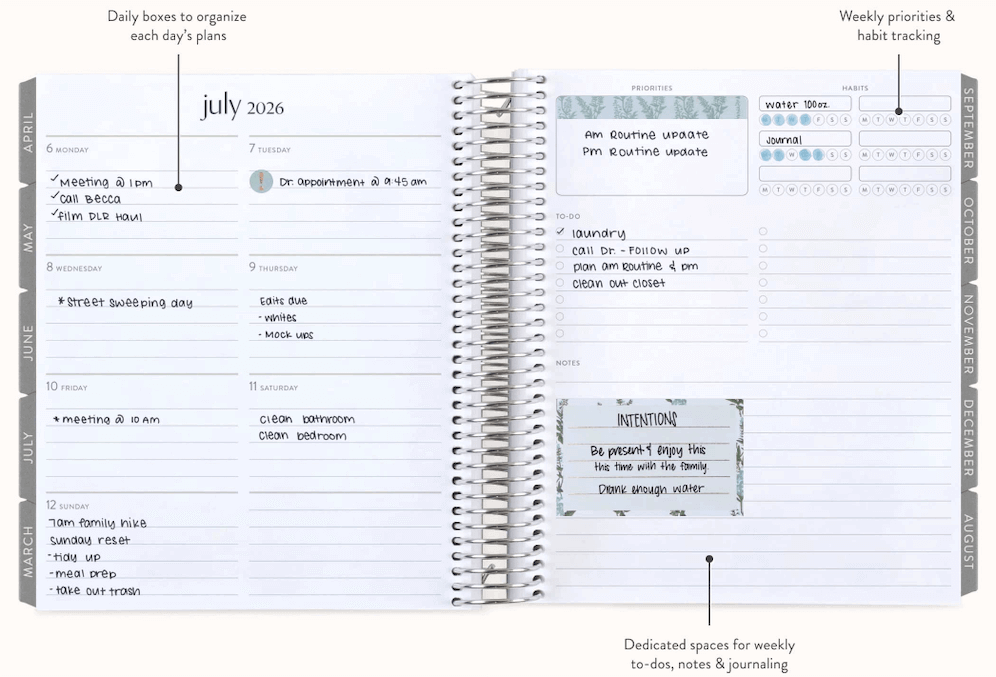
The Erin Condren Dashboard LifePlanner™ is the latest of four weekly planner layouts (the other layouts include horizontal, vertical, and hourly). Each two-page weekly spread of the dashboard layout offers seven days of horizontal planning + an extra notes section on one side and a dashboard on the other for tracking priorities, to-dos, habits, and more in the full-width lined notes section. It’s the perfect hybrid planning layout for those who love traditional lines for planning each day + a big-picture weekly overview. Like all Erin Condren LifePlanners, the dashboard layout also includes two-page calendars throughout for monthly planning, plenty of note pages for journaling, notes, and inspiration, monthly productivity pages, and more.
Dashboard LifePlanner™ Pros and Cons
To help you decide if the weekly Dashboard LifePlanner™ is for you, let’s explore the pros and cons:
Pros:
- Hybrid Layout: Combines weekly planning lines for each day with a full dashboard page for the perfect balance of structure and flexibility
- Big-Picture Organization: The dashboard provides dedicated space for tracking priorities, habits, and to-dos all in one view
- Complete Planning System: Includes monthly calendars, productivity pages, and note sections to keep your entire life beautifully organized
- Easy-to-Use: Featuring clean and simple sections for planning each day of the week, tracking any habits you like, listing to-dos, and focusing on priorities, this planner layout makes staying organized and productive super-easy!
Cons:
- Compact Planning Space: Provides room for higher-level weekly planning rather than detailed daily scheduling or full sentences you might prefer in a horizontal layout
- Weekly Focus Structure: Built-in monthly and weekly to-do lists, but would require using note sections if you prefer dedicated daily to-do lists
- Designated Sections: Perfect for those who like organized sections for everything, but may feel restrictive for planners who prefer more open spaces for creative planning
Who Should Use a Dashboard LifePlanner™?
The Dashboard LifePlanner™ is perfect for the planner who needs to see their entire week at a glance while maintaining organization. This innovative weekly layout works beautifully for:
- Big-picture planners who prefer a weekly overview with the ability to plan each day in a compact, organized format
- Visual organizers who process information better with a dedicated dashboard for categorizing priorities, tracking daily and weekly habits, and managing to-dos
- Structure seekers who've found traditional layouts either too rigid or too open-ended and need the perfect hybrid solution with dedicated sections
If you love the idea of combining structured weekly planning for each day with a customizable dashboard for weekly priorities and tracking, this is your perfect planning match! The unique dashboard layout gives you a complete view of your week while maintaining the signature LifePlanner™ quality and personalization options.
How to Plan in a Dashboard LifePlanner™
Step 1: Design Your Dashboard Strategy.
Before diving into weekly planning, create a personalized system that maximizes the four dedicated dashboard sections:
- Priorities Box: Determine how you'll use this section—for top 3 weekly goals, focus areas, or a motivational quote for the week
- Habit Trackers: Select 6 meaningful habits to track consistently across your week (hydration, exercise, reading, etc.)
- Checklist: Decide whether you'll use this for master weekly to-dos, categorized tasks, or a running list that gets updated throughout the week
- Notes Section: Plan how to best utilize the generous half-page notes area—perhaps for journaling and weekly reflections, meal planning, or project details
Pro Tip: Take a picture of your most successful dashboard layout to use as a reference for future weeks, helping you quickly recreate your ideal setup without starting from scratch.
Step 2: Fill in Your Monthly Calendars.
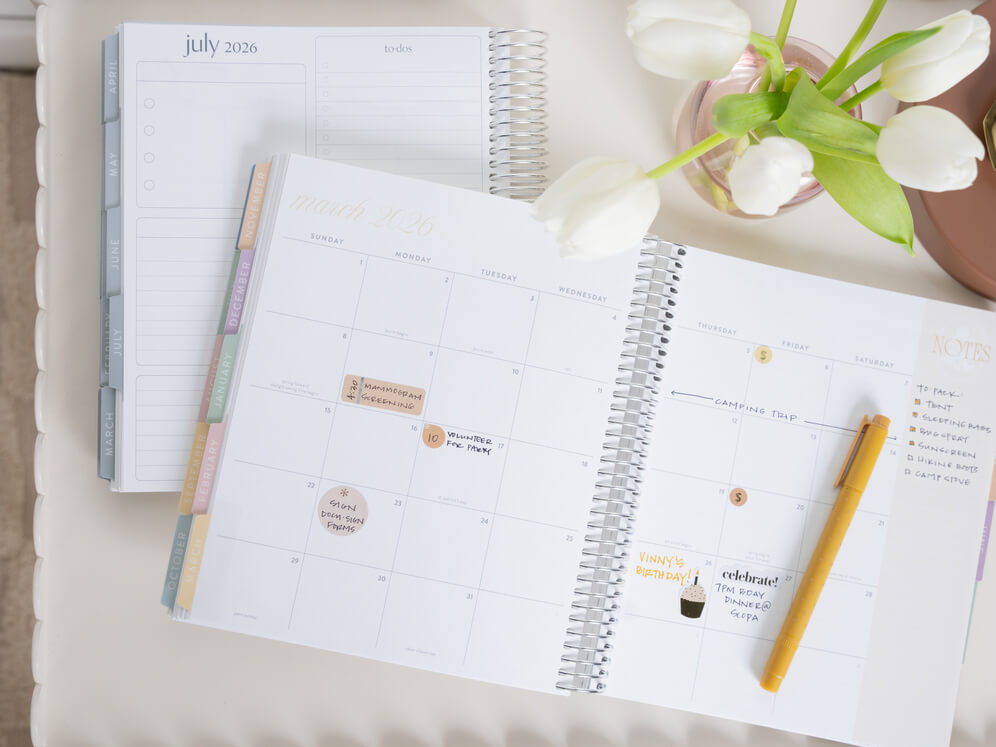
Build your monthly foundation with these strategies:
- Transfer all recurring events, birthdays, and appointments from your previous planner.
- Block out important dates, deadlines, and commitments with color-coding for different life areas.
- Use the monthly view to identify busy periods and lighter weeks to help balance your schedule.
Step 3: Set Up Your Monthly Productivity Page.
Maximize the monthly productivity pages with these approaches:
- List your top 3-5 priorities for the month to maintain a clear focus.
- Use the tracker section to monitor monthly goals or tasks.
- Note any special projects, events, or focus areas unique to this month.
- Review last month's productivity page to celebrate progress and carry forward ongoing goals.
- Use the monthly note page to journal, reflect, or recap highlights from the month.
Step 4: Utilize Note Pages Strategically.
Make the most of the lined note pages throughout your Dashboard LifePlanner™:
- Brain Dumps: Use a note page for unfiltered brainstorming before organizing ideas into your weekly dashboard.
- Project Planning: Dedicate pages to mapping out steps for bigger projects before scheduling them in your weekly spreads.
- Reference Information: Create collection pages for frequently needed information, passwords, or contact details.
- Journaling and Reflection Pages: Design custom templates for weekly or monthly journaling and/or reflections to track your progress.
- Inspiration: Collect quotes, ideas, or resources that align with your current goals.
Pro Tip: If you prefer daily to-do lists, use checklist sticky notes or dedicate a note page to creating them each week, then reference them alongside your weekly spread.
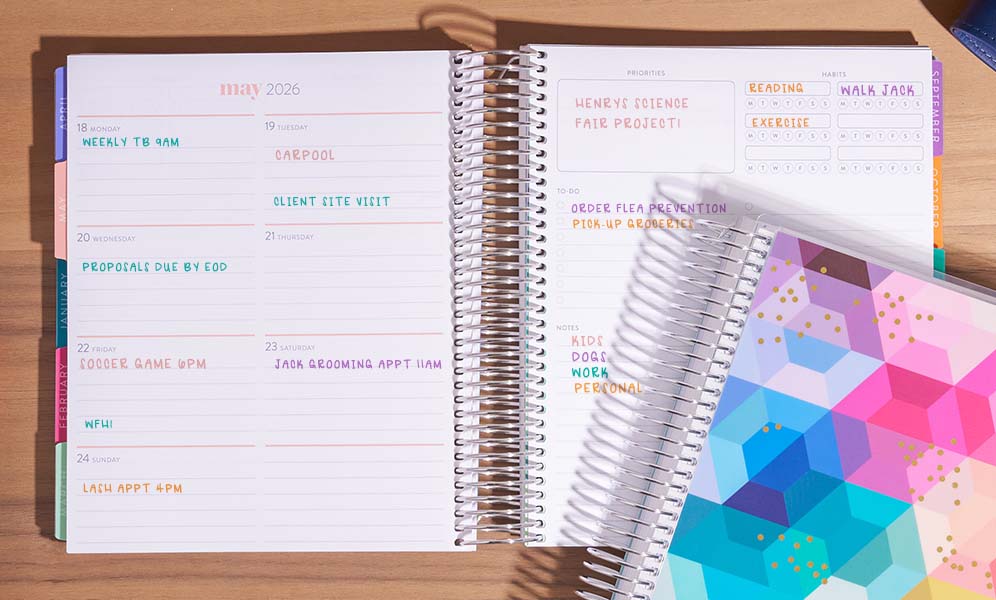
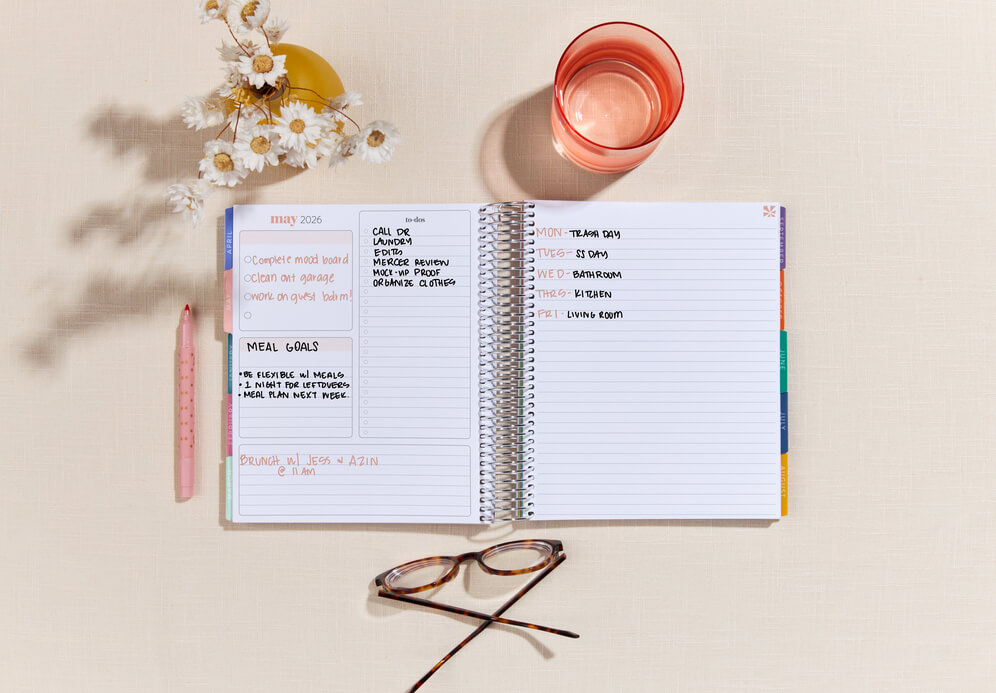
Step 5: Leverage the Weekly Dashboard Format.
This is where the Dashboard LifePlanner™ truly shines with its pre-designed sections:
- Schedule a consistent weekly planning session (Sunday evenings work well for many planners!).
- Fill in each day's section in your weekly spread with key appointments and tasks for that day.
- List your top weekly priorities in the dedicated priorities box for clear focus.
- Write in your 6 chosen habits in the tracker boxes and check them off as you complete them each day.
- Use the checklist for actionable weekly to-dos that can be completed and checked off.
- Reserve the half-page notes section for weekly meal plans, brainstorming, weekly journaling, or capturing important information.
Pro Tip: Create a consistent color scheme for your dashboard sections that visually connects related items across both pages of your weekly spread, helping you see your entire week at a glance.
Step 6: Create a Dashboard Weekly Review Ritual.
End each week with a quick review process:
- Check off completed items on both your weekly planning side and dashboard page.
- Transfer any unfinished tasks to the upcoming week's dashboard or specific days.
- Note any patterns in what did or didn't get accomplished.
- Take a moment to acknowledge your weekly wins, no matter how small.
- Prepare your dashboard template for the coming week with fresh categories.
Remember, the beauty of the Dashboard LifePlanner™ is how it gives you a complete view of your week while balancing structured planning with organized tracking sections. Don't be afraid to adapt this weekly system to your unique planning style; your planner should work for you!
10 Creative Dashboard LifePlanner™ Prompts
Transform your planning experience with these inspiring planning prompts that maximize the specific sections of your Dashboard LifePlanner™ weekly layout:
- Weekly Focus System: Use the priorities box to list your "Big 3" goals for the week, then assign specific action steps to each day in your weekly planning section to see your entire week's focus at a glance.
- Habit Harmony: Select 6 complementary habits that work together toward a larger goal (like 6 aspects of self-care or 6 steps in a morning routine) to track consistently across your week.
- Project Progression: Write your current project phase in the priorities box, track project work as a weekly habit, list specific weekly tasks in the checklist, and use the notes section for details and brainstorming.
- Theme-Based Planning: Choose a weekly theme for your priorities box, select habits that support it, list theme-related tasks in your checklist, and use the notes section for inspiration and reflections on your theme throughout the week.
- Monthly Calendar Integration: Mark project milestones on your monthly calendar pages, then break them down into weekly priorities, habit trackers, and actionable checklist items in your dashboard for seamless monthly-to-weekly planning.
- Balanced Life View: Dedicate your priorities box to each life domain (work, relationships, health, etc.) on a rotating basis, with corresponding habits, tasks, and notes aligned to that focus area for a truly balanced week.
- Productivity Page Transfer: Use your monthly productivity pages to set broader monthly goals, then transfer the current week's focus to your dashboard priorities box with corresponding habits and tasks to maintain consistency.
- Weekly Visualization: Create a mini vision board or mind map in your notes section that visually represents your weekly priorities, with your checklist containing the actionable steps to get there.
- Decision Dashboard: Use the notes section to create a 2x2 matrix (urgent/important) for evaluating your weekly tasks, then transfer them to the appropriate section—priorities box for important/urgent, checklist for urgent/not important, etc.
- Week-at-a-Glance Review: Transform your dashboard into a weekly review tool by using the priorities box for your focus areas, habit trackers for progress indicators, checklist for accomplishments, and notes section for lessons learned and next week's planning.
The beauty of the Dashboard LifePlanner™ is how its pre-designed weekly sections create a framework that lets you see your entire week at a glance while still allowing for personal creativity and adaptation!
Customize your new LifePlanner™ by choosing your cover design, then interior design, select your layout preference, your calendar dates, add on extra pages, and even personalize it if you like!
Explore More LifePlanner™ Layouts.
In the market for multiple planners (for yourself or as gifts), or curious about other planner types and how to organize your planner? You’ll love these popular planning guides:
- How to Plan in a Vertical Weekly LifePlanner™ + 10 Creative Planner Prompts
- How to Plan in a Horizontal Weekly LifePlanner™ + 10 Creative Planner Prompts
- How to Plan in an Hourly LifePlanner™ + 10 Creative Planner Prompts
- Daily LifePlanner™ vs. Weekly LifePlanner™: Which One Is Better for You?
- LifePlanner™ Hacks and Planning Tips
- How to Start Planning